Calluses are the skin’s natural armor against repetitive friction. When they grow too thick, they can become painful and unsightly. Proper callus removal at home—when done with care—keeps feet smooth without risking cuts or infection.
Understanding Why Calluses Form
Calluses are a localized thickening of the stratum corneum, the outermost layer of skin. Your body builds this protective layer in response to repeated pressure or rubbing. Think of a runner’s heel, a dancer’s ball of foot, or someone who spends long hours on their feet. The thickened skin shields against blistering, but if it becomes too hard, it can crack and cause discomfort.
While the physiology is simple, the triggers vary: ill‑fitting shoes, flat feet, or even a sudden change in activity level. Recognizing the source is the first step in preventing recurrence.


For deeper insight, you can consult professional foot care at a spa or clinic.
The Golden Rules of Safe Callus Removal at Home
Safety is paramount. Many home attempts end in cuts or fungal infections because impatience overrides caution. Follow these non‑negotiable rules:
- Never use sharp blades. Cheaper “cheese grater” files or surgical blades can strip healthy skin and bleed.
- Stop before pain. If the skin turns pink or feels tender, you’ve gone too far.
- Sanitize tools. Wash your pumice stone, foot file, or emery board with hot soapy water after each use.
- Know your limits. If you have diabetes, poor circulation, or peripheral neuropathy, skip home removal and see a podiatrist.
Step‑by‑Step Guide to Callus Removal at Home
Approach the process in three phases: softening, exfoliating, and hydrating. Treat each step as a separate ritual.
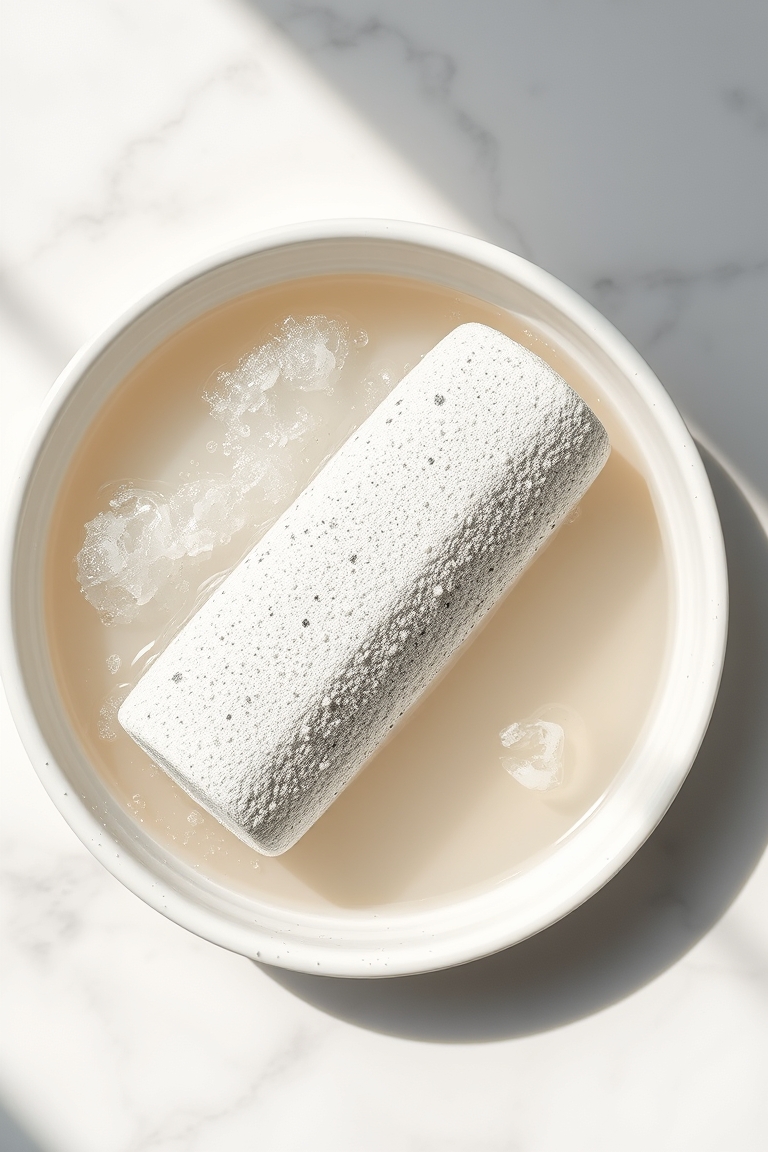
Phase 1: Softening the Skin
Hard, dry calluses resist filing. A warm soak loosens keratin and makes the next steps gentle.
Fill a basin with water just below boiling—about 37–38°C. Add a tablespoon of Epsom salt or a few drops of mild soap. For stubborn calluses, a splash of apple cider vinegar (5–10%) helps break down dead cells through mild acidity. Soak for 15–20 minutes, then pat dry.
Phase 2: Gentle Exfoliation
After soaking, the skin is pliable. Use the right tool for the job:
- Pumice Stone. Wet the stone and rub in a slow, circular motion. Let the stone’s texture do the work; avoid pressing hard.
- Foot File (Emery Board). Choose a medium grit (around 80). File in one direction—toward the toe—rather than back‑and‑forth to prevent micro‑abrasions.
- Electric File. If mobility is an issue, use the lowest setting. Always keep the device moving; never let it sit on one spot.
- Chemical Peels. Products with salicylic or lactic acid dissolve the “glue” between dead cells. Use sparingly; they can cause widespread peeling.
Focus on high‑pressure zones: heels, ball of the foot, and the sides of the big toe. Stop when the skin feels smooth, not when it’s completely flat.
Phase 3: Locking in Moisture
Exfoliation opens the skin’s pores. Apply a thick, urea‑based cream (10–20%) or a petroleum‑based ointment immediately. Urea is a keratolytic agent that softens the callus while hydrating. Follow up with cotton socks to create an occlusive environment that locks in moisture.
Long‑Term Success: Foot Callus Tips
Consistency beats intensity. A five‑minute routine twice a week outperforms an hour of frantic filing once a month.
Choose Shoes Wisely
Even after removal, tight shoes will rebuild the callus. Opt for a wide toe box and solid arch support. If a particular spot on your foot always develops a callus, that’s a clear sign of rubbing. Silicone inserts or moleskin padding can cushion that spot and reduce friction. Consider orthotic inserts if you have flat feet or high arches.
Daily Moisturizing Habits
Apply a rich foot cream before bed. After the lotion, slip on cotton socks and leave them on overnight. The socks act as a barrier that keeps the cream from rubbing off and allows the skin to absorb deeply.
Hydration and Nutrition
Dry skin is more prone to thickening. Drink at least eight glasses of water a day and include omega‑3‑rich foods—walnuts, flaxseed, salmon—in your diet. These nutrients support the skin’s lipid barrier, making it more resilient to pressure.
Tool Comparison: Which Implements Work Best?
Not every tool suits every callus. Below is a quick reference:
- Pumice Stone. Ideal for mild to moderate calluses; gentle and less likely to over‑file.
- Foot File (Emery Board). Best for sturdy heel calluses; requires careful use.
- Electric File. Convenient for those with limited hand strength; use the lowest setting.
- Chemical Exfoliants. Salicylic or lactic acid peels; effective but can cause sensitivity if overused.
When to Seek Professional Help
Calluses that persist or worsen despite diligent home care may signal an underlying issue. Refer to a podiatrist if you notice:
- Infection signs. Redness, swelling, warmth, or pus from a crack.
- Deep fissures. Bleeding or severe pain from a crack.
- Diabetes or neuropathy. Any foot care should be supervised by a medical professional.
- Unresponsive calluses. No improvement after a month of consistent care may indicate a structural problem.
Advanced Care: The Role of Massage
Muscle tension and fascia tightness often contribute to callus formation. A gentle foot massage can release tension, improve circulation, and redistribute pressure.
Use a tennis ball or a foot roller to target the plantar fascia. Rolling for 30–60 seconds on each foot loosens tightness. Finish with a warm oil massage—olive or almond oil—to stimulate blood flow and accelerate skin regeneration.
Common Myths About Callus Removal
Let’s debunk a few misconceptions that circulate online.
Myth 1: The thicker the callus, the more you should file. Filing all at once can trigger a rebound effect—your skin reacts to the sudden loss of protection by producing more thickened skin. Slow, steady reduction is safer.
Myth 2: Acidic callus removers are unsafe. When used as directed, keratolytic acids like salicylic acid are safe for most people. Avoid them on broken or irritated skin.
Myth 3: Calluses can be cured permanently. Calluses are a functional response. Without addressing the underlying cause—shoe fit, gait, or activity level—they will return. Management, not a one‑time cure, is the goal.
Summary Checklist for Smooth Feet
- Soak feet in warm water for 20 minutes.
- Gently exfoliate with a pumice stone or file.
- Apply a urea‑based moisturizer.
- Wear cotton socks overnight.
- Inspect shoes for tight spots or wear.
- Stay hydrated throughout the day.
Frequently Asked Questions
How often should I perform callus removal at home?
For most people, a gentle exfoliation session once or twice a week suffices. Over‑filing can irritate the skin and trigger new callus formation. Listen to your skin—if it feels smooth, skip the next session.
Can I use a razor to remove a callus?
No. Razor blades, knives, or any sharp instruments risk deep cuts and infection. Stick to abrasive tools like pumice stones or files that wear down skin gradually.
Why do my calluses keep coming back?
Calluses return when the source of friction remains. This could be ill‑fitting shoes, a faulty gait, or prolonged standing on hard surfaces. Identifying and correcting the root cause is essential for lasting relief.
What is the best moisturizer for hard calluses?
Look for creams containing urea, lactic acid, or salicylic acid. These ingredients hydrate and chemically exfoliate dead skin. For very dry heels, a thick ointment plus overnight socks delivers the best results.
Is it normal for a callus to hurt?
A mild callus is usually painless. Thick calluses can press into deeper layers, causing pain. If a callus cracks (fissures) or inflames, increase moisturizing or seek professional care.
Leave a Reply